How to capture the perfect photo: Shutter speed tips
In photography, speed or exposure time is the length of time a camera’s shutter is open to expose light to the camera sensor. It is an important concept because it determines how much light you let in and how motion will be captured in your photo. Faster shutter speed settings will freeze motion, while a slower one will blur it.
If you’re photographing a fast-moving subject, like a bird in flight or a car racing down the street, you’ll need to use a fast shutter to freeze the action. Conversely, if you want to capture the feeling of movement, like flowing water or blowing leaves, you’ll need to use a slow speed.
A slow shutter is also important when shooting in low-light conditions. In some conditions, If your shutter speed on camera is too slow, your photo will be blurry due to the camera shake, maybe you need a tripod.
1) Shutter Speed Settings: how to freeze or blur motion
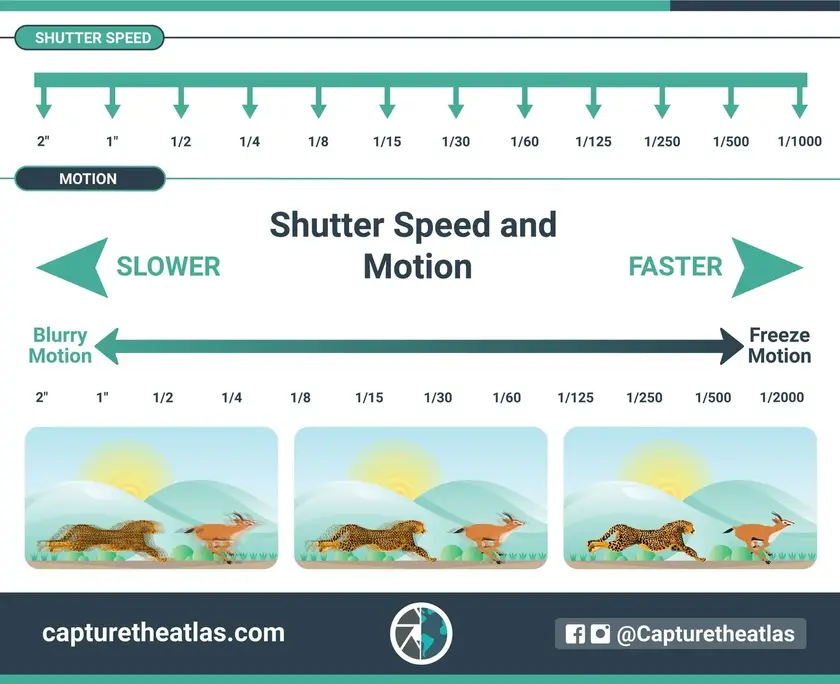
A fast shutter will result in a very brief exposure time, which can be used to freeze motion. A slow will result in a longer exposure time, which can be used to blur motion. The choice of shutter speed depends on the desired effect and the type of camera being used.
For example, if you are taking a picture of a moving object, you would want to use a faster shutter speed to freeze the action. Conversely, if you are trying to capture the feeling of movement, you would want to use a slower shutter speed to create a sense of motion blur.
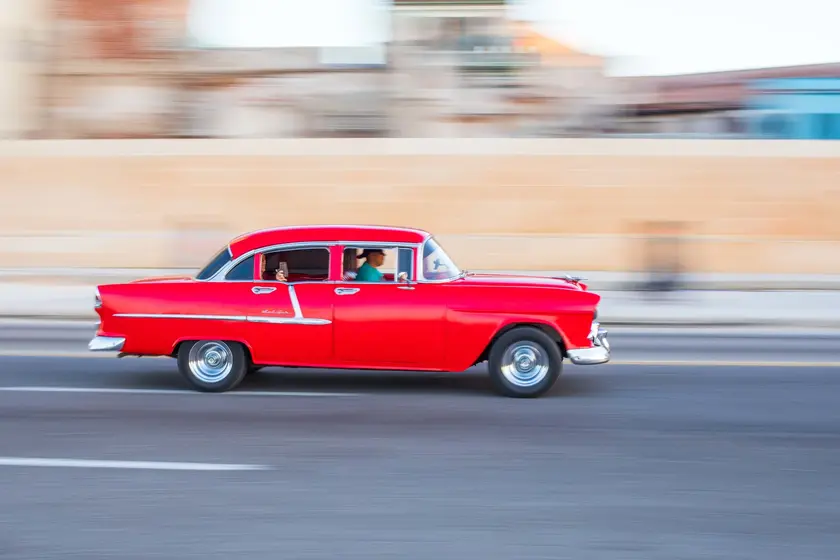
Panning camera with slow speed to capture the moving object.
- To do this, you’ll need to pan your camera with the subject.
- This technique takes a bit of practice, but it’s well worth it for those amazing action shots.
- Use a tripod to keep your camera steady as you pan.
- Set your shutter speed to 1/5 or slower.
- Begin panning before your subject enters the frame, and continue until they exit.

Capture freeze a flying bird with a high shutter speed
- 1. Use a fast speed. The faster the better – around 1/2000th of a second or higher. This will help freeze the bird in motion and avoid any blurriness.
- Set your camera to continuous shooting mode. This will allow you to take multiple photos in quick succession, increasing your chances of getting that perfect shot.
- Pre-focus your camera on an area where you think the bird will fly. This way, you won’t have to worry about missing the shot while your camera is trying to focus.
- Be patient! It takes time and practice to get that perfect photo, so don’t get discouraged if it doesn’t happen right away.
2) Low light: how to capture clear photos in dim conditions

In low-light photography, one of the most important factors is speed. The slow shutter speed will allow more light to enter the camera, but it can also lead to blurry photos. To avoid this, use a tripod or raise your ISO. A higher ISO will make your photos appear grainy, but it will also make them clearer.
If you’re shooting in manual mode, try to keep your shutter speed settings at 1/60 or higher. If you’re using a point-and-shoot camera, set the ISO to 400 or higher. With these tips, you’ll be able to take clear, beautiful photos in any lighting condition.
The longer the shutter is open, the more light is let in. This can be used to your advantage in low-light situations by setting a slower shutter speed on camera and using a tripod. A tripod will help keep your camera still so you don’t end up with a blurry photo. Just be sure to use a tripod or other support to keep your camera steady.
3) Night photography: how to take photos of the stars


Night photography is one of the most rewarding genres of photography. Capturing the stars in all their glory is a challenging but achievable feat with the right equipment and knowledge. Here are some tips on how to take photos of the stars.
To get started in night photography, you’ll need a DSLR camera with a tripod. A wide-angle lens is also recommended for capturing as much of the night sky as possible. Set your camera to manual mode and start by setting your ISO to 1600.
Then, set your aperture to its lowest possible number (the largest opening). This will let in the most light and help you capture sharp images of the stars. Finally, set your shutter speed on camera to about 20 seconds. This will ensure that your photos are properly exposed without being overexposed.
Trying to capture a photo of a star trail can be tricky. The most important factor when taking photos of star trails is speed. The slow shutter speed settings will result in a long exposure, which is necessary to capture the light trails left by stars in the night sky.
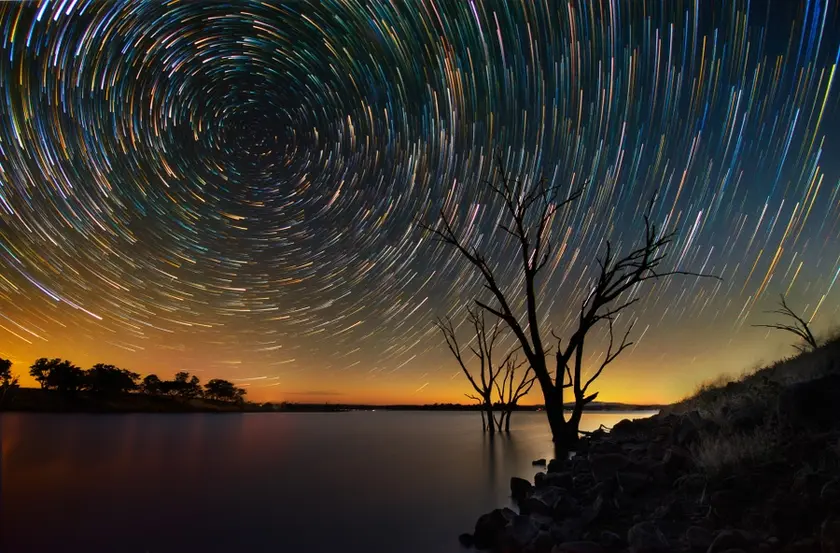
Normally star trail uses a very slow shutter, sometimes up to an hour. The “B” shutter (open shutter) is the only choice. Make sure it is not overexposed, you need to keep ISO as lower as the limit of the camera, around ISO50-100. Set the aperture smaller as your lens limit, but in acceptance quality, around F18-22.

If that was not enough time for you to capture a perfect star trail photo, maybe you need an ND filter. Depending on the environment light situation, if too much light maybe you need a higher ND filter.
You should also set your camera’s timer to take several photos in succession so that you can choose the sharpest image later on. With these tips, you should be able to capture stunning photos of star trails of the milky way.
4) Action shots: How to capture fast-moving subjects

Capturing a fast-moving subject can be difficult, but there are ways to make it easier.
First, you need to understand shutter speed and how it works. Shutter speed is the amount of time that the camera’s shutter is open, and it directly impacts the sharpness of your photo.
To freeze a fast-moving subject, you’ll need to use a faster shutter speed on camera. This means that you’ll need more light, so try to shoot in bright conditions or use a flash.

If you’re shooting handheld, you’ll also need to use a faster shutter speed to avoid camera shake. A rule of thumb is to use a shutter speed that is equal to or greater than your focal length. For example, if you’re using a 100mm lens, your minimum shutter speed should be 1/100 sec.
The continuous shooting mode enables the camera to capture images at a continuous rate even after you press the shutter button. This function was helpful when capturing action shots.
Conclusion: Shutter Speed on Camera

In photography, the shutter speed is one of the most important factors in getting a sharp image. Here are some shutter speed tips on how to capture the perfect photo:
To freeze action, use a fast shutter speed. This will help to prevent motion blur and allow you to capture fast-moving subjects. Use a shutter speed that is at least 1/500th of a second when photographing moving subjects.
To create motion blur, use a slow shutter speed. This can be used to add drama or convey a sense of movement in your photos. A good rule of thumb is to use a shutter speed that is at least 1/30th of a second when photographing static subjects.
Hope you have a clear understanding of the shutter speed on camera, if you have any questions you can ask me by leaving a comment. If you enjoy this article, please help me share it with other readers too, I’d much appreciate it. Thank you for reading.


