How to use Aperture: Aperture settings in Photography
The aperture is one of the three major elements of photography. It is an adjustable opening in a camera lens through which light passes to reach the sensor. It controls two important factors in a photograph: depth of field and amount of light.
Depth of field is the distance between the nearest and farthest objects in a scene that appear acceptably sharp in an image. This setting affects the depth of field.
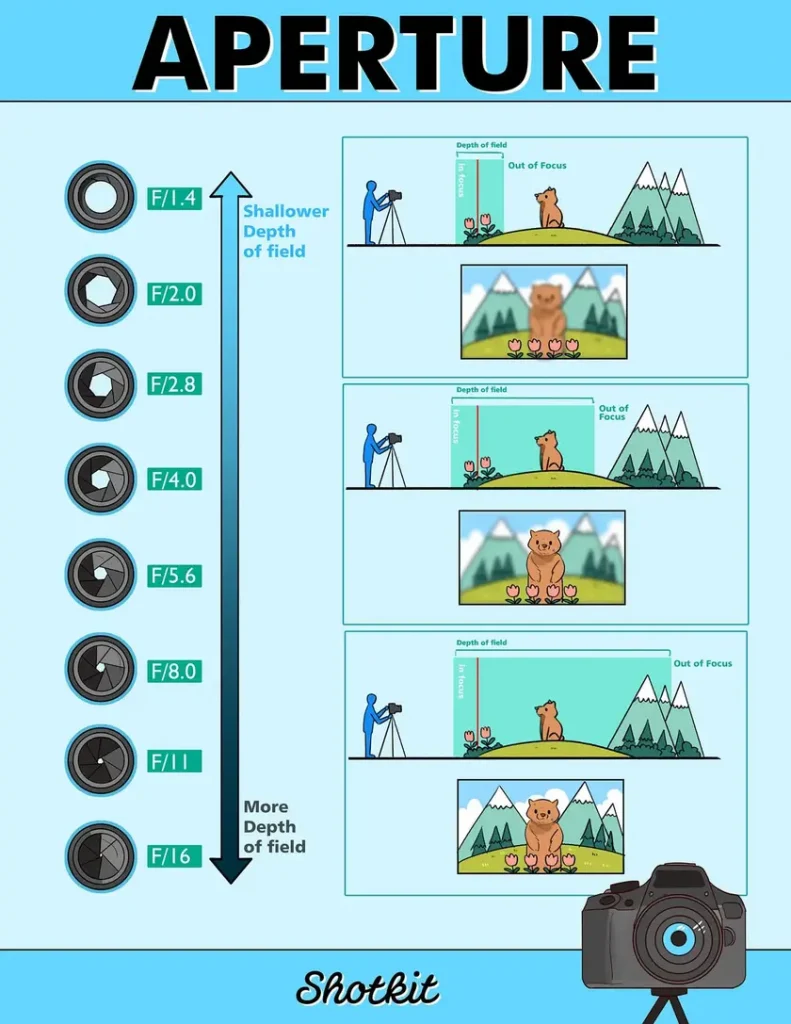
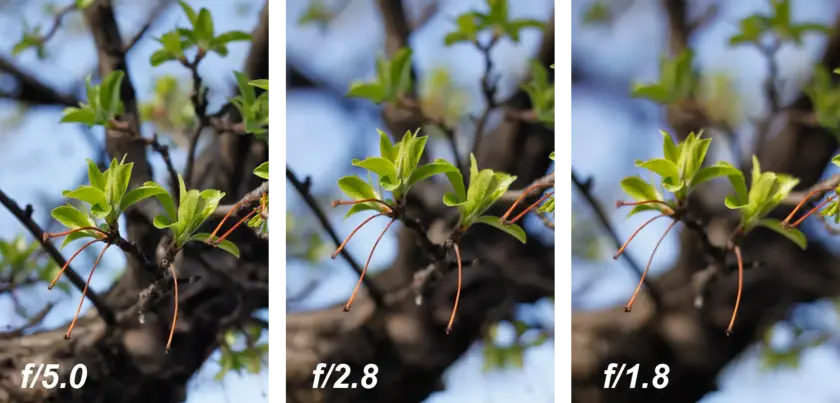
A small aperture (large f-number) results in a large depth of field, with everything from near to far appearing sharp. A large aperture (small f-number) gives a shallow depth of field, and only a small area appears sharp with the background blurred.
The amount of light passing through it also affects exposure. A larger aperture lets more light into the camera, resulting in a brighter image. Using smaller aperture settings in photography reduces the amount of light, making the image darker.
In a similar way, shutter speed controls the amount of time that light can enter the camera. A fast shutter speed lets in less light, resulting in a darker picture.
How does the aperture affect your photos?
In this article, we’ll give you a crash course on what aperture is and how to use it.
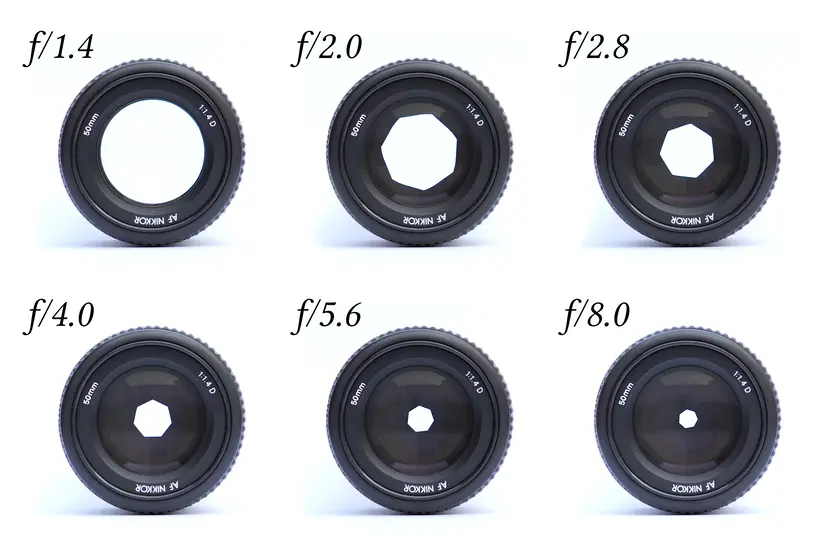
When you’re talking about the f-stop, you’re talking about the size of the hole in your lens that allows light to pass through. The bigger the hole, the more light comes in. But there’s a trade-off: As the f-stop number gets bigger, your depth of field gets narrower.
Depth of field is simply how much of your photo appears to be in sharp focus. A shallow depth of field means that only a small part of the photo is in focus, while a deep depth of field means that most or all of the photo is in focus.

When you have a shallow depth of field, it can be used to draw the viewer’s attention to something specific in your photo.
Say you’re taking photos at an event, and there are lots of things happening all around you. You can use a shallow depth of field to draw the viewer’s attention to what you want them to see.
You do this by setting your camera to a big aperture (a low f-stop number), which lets more light into the camera and creates a shallow depth of field.
Low vs high F-stop numbers
When it comes to aperture settings in photography, there are two schools of thought: low vs high F-stop numbers. Each has its own advantages and disadvantages. Here’s a breakdown of the two approaches:
Low f-stop Numbers (Like F2): Advantages
- Low F-stop numbers allow more light into the camera, which is ideal for low-light situations.
- It creates a shallow depth of field, which can be used to great effect in portraits or other images where you want to isolate your subject from the background.
- Low F-stop numbers result in greater overall sharpness since less of the image is affected by diffraction (a blurring effect caused by the bending of light as it passes through the camera’s lens).
Low F-stop Numbers (Like F2): Disadvantages
- Lower F-stop numbers are not necessarily better all the time. Using a very large aperture number (such as f/2) to get a shallow depth of field can work well in portraits but is not so great for landscape photography.
- Photos appear blurry. This is because the low f-stop allows more light to enter the camera, which can make it difficult to focus.
High F-stop Numbers (Like F18): Advantages
- It allows less light into the camera, which is helpful in high-light situations.
- It creates a deep depth of field, which can be helpful for landscape or other photos where you want the background to be clear.
- High F-stop numbers help you get a sharper image overall.
High F-stop Numbers (Like F18): Disadvantages
- Because the F-stop is so small, not as much light can enter the camera. This might make it difficult to take pictures in low-light situations or to capture fast-moving subjects.
- A high F-stop number results in poor-quality photos. Each lens comes with an ultimate F-stop number, normally F8 to F10, if high then this F-Stop quality will decrease. Make sure you know the ultimate F-Stop number for your lens.
How to use aperture to Create depth of field
Depth of field is the distance between the nearest and farthest objects in an image that appear acceptably sharp. It’s determined by the aperture setting on your camera, and it has a huge impact on the overall look of your photos.
If you want a shallow depth of field, you’ll need to use a large aperture (a small f-stop number). This will make your background appear blurry, which can be very effective for portrait photography.
On the other hand, if you want a deep depth of field, you’ll need to use a small aperture (a large f-stop number). This will keep both your foreground and background in focus, which is ideal for landscape photography.
Experiment with different aperture settings to see how they affect your photos. You may be surprised at the results!
Create Bokeh Effect with Aperture

Bokeh is the term used for the aesthetic quality of the blur in out-of-focus areas of an image. It’s usually most visible around small highlights, like specular reflections and bright points of light.
Creating bokeh is all about controlling your aperture settings in photography, which is the opening in your lens through which light passes.
Aperture is measured in f-stop numbers, with a lower number corresponding to a wider opening. So, if you want to create bokeh, you’ll need to use a low f-stop like f/2.8 or f/4. The wider the aperture, the more pronounced the effect will be.

Bokeh has been defined as “the way the lens renders out-of-focus points of light”. Differences in lens aberrations and aperture shape cause some lens designs to blur the image in a way that is pleasing to the eye, while others produce blurring that is unpleasant or distracting (“good” and “bad” bokeh, respectively).
Bokeh occurs for parts of the scene that lie outside the depth of field. Photographers sometimes deliberately use a shallow depth of field to create images with prominent out-of-focus regions.
Conclusion: How to use Aperture
As a beginner, you may not know how to use aperture to its full potential. However, by understanding what it is and how it works, you can easily improve your photos.
The aperture is not a hard subject in photography, practice makes perfect, try all the settings to create an amazing photo. Take your camera now, walk outside and start capturing.
Hope you enjoy this article, if you like it, please share it with others too. Let’s improve together, thank you for reading. If you have any questions, please leave a comment below.


